Rudder x Pulp: Own your repositories and include them in your patch management strategy
Integrate Rudder with Pulp for a complete patch management strategy Managing your own software repositories has many upsides: control, customization, security as it enables you to implement your own security measures, dependency management, etc. In particular, it is recommended as soon as one wants to control what packages are installed on an infrastructure. It is a key feature in patch management processes. For instance, a standard patching strategy would involve updating development machines first and foremost. After confirming that the patch did not break anything, the pre-production machines would be updated. Only then can the patch be applied to production machines. This process can take several weeks. Thus, when it’s time to upgrade production machines, the frozen repositories enable patching them similarly to the development machines. Otherwise, it wouldn’t be as relevant to test the first patch on development machines. For those who have never heard of Pulp, it can be summarized as “Pulp is an open source project that makes it easy for developers to fetch, upload, organize and distribute Software Packages on-prem or in the cloud.” (source: official documentation.) Basically, it is a free software you can use to manage your own repositories in an optimized manner. Thus, it’s a good solution to supplement Rudder’s patch management solution. Rudder is also efficient at managing repository files. Let’s draw a diagram of the two solutions complementing each other: For this lab, I recommend following the straightforward procedure to install Pulp in a Single container. The full procedure is accessible here. First, install docker.io and pull Pulp image: Then: You can choose admin as username and password. You will also need to install pulp CLI: Check the CLI is working: For those unfamiliar with Pulp concepts such as remote, repository, publication and distribution, please check this documentation. For this article, we arbitrarily chose to create a software repository for VS Code. Now, we need to create a distribution for our development machines. You will need your publication’s If your patch management strategy includes pre-prod and prod machines, you will need to create distributions for those: For now, those distributions point towards no publication. After patching your development machines, you will want to patch preprod machines with the same patches. Then, you will need to update the preprod distribution: The following is made for Linux distributions having the apt package manager. Please find the attached This will create a technique that takes five parameters, whose role will be to configure a file and its permissions in the Now, let’s instantiate this technique in creating the associated directive. Then go to the Parameters tab (4): You can fill the parameters according to your own customised repositories. With the example given, it will be: For the Repository url field (6), you will find it in the field You can also find it with the command: Once you successfully filled the parameters, you can select in the Target rules tab the adequate rule to apply the configuration on development machines. If you wish to use Pulp for a production environment, we advise you to use the pulp/pulp:https image and install it on multiple containers to be able to scale up (see Quickstart - Pulp Project). You will also find How-to guides to configure your own SSL certificate or your DB encryption.What you will find in this article
Why manage your own software repositories
What is Pulp, and how does it supplement Rudder

How to install Pulp
$ sudo apt update
$ sudo apt install -y docker.io
$ sudo docker pull pulp/pulp$ mkdir -p pulp/settings/certs pulp/pulp_storage pulp/pgsql pulp/containers
$ cd pulp
$ echo "CONTENT_ORIGIN='http://$(hostname):8080'" >> settings/settings.py
$ sudo docker run --detach \
--publish 8080:80 \
--name pulp \
--volume "$(pwd)/settings":/etc/pulp \
--volume "$(pwd)/pulp\_storage":/var/lib/pulp \
--volume "$(pwd)/pgsql":/var/lib/pgsql \
--volume "$(pwd)/containers":/var/lib/containers \
--device /dev/fuse \
pulp/pulp
$ sudo docker exec -it pulp bash -c 'pulpcore-manager reset-admin-password'$ sudo apt install -y python3-pip python3-venv
$ python3 -m venv pulp_env
$ source pulp_env/bin/activate
$ pip install pulp-cli pulp-cli-deb
$ pulp config create --username admin --base-url http://localhost:8080 --password admin$ pulp deb remote listCreate your first own software repository
$ NAME='visual-studio-code-stable-amd64'
$ REMOTE_OPTIONS=(
--url=https://packages.microsoft.com/repos/code
--distribution=stable
--component=main
--architecture=amd64
)
$ pulp deb remote create --name=${NAME} ${REMOTE_OPTIONS[@]}
$ pulp deb repository create --name=${NAME} --remote=${NAME}
$ pulp deb repository sync --name=${NAME}
$ pulp deb publication create --repository=${NAME}pulp_href from the output of the last command.$ pulp deb distribution create --name=dev-vscode --base-path=dev-vscode --publication=<publication_pulp_href>$ pulp deb distribution create --name=preprod-vscode --base-path=preprod-vscode
$ pulp deb distribution create --name=prod-vscode --base-path=prod-vscode$ pulp deb distribution update –name=preprod-vscode publication=<publication_pulp_href>Configure Rudder to create software repository files and configure them to point towards Pulp distributions
technique-pulp.yml file. It is a Rudder technique in the YAML format.
In Rudder, create a new technique, click on YAML editor button (1), copy the file’s content in the YAML editor (2). Then, Save the technique (3).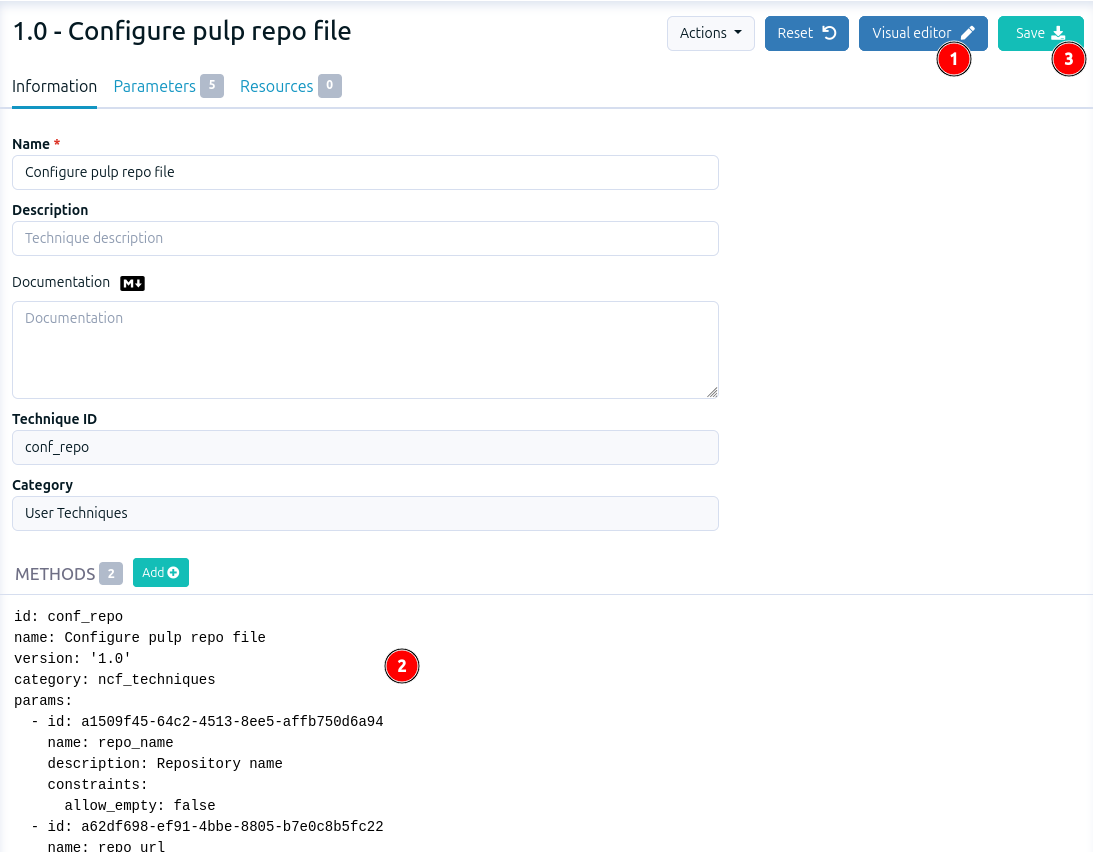
/etc/apt/sources.list.d/ directory.
Go the Directive menu (1), find Configure pulp repo file (2) (3)
in the drop-down menu and click on Create.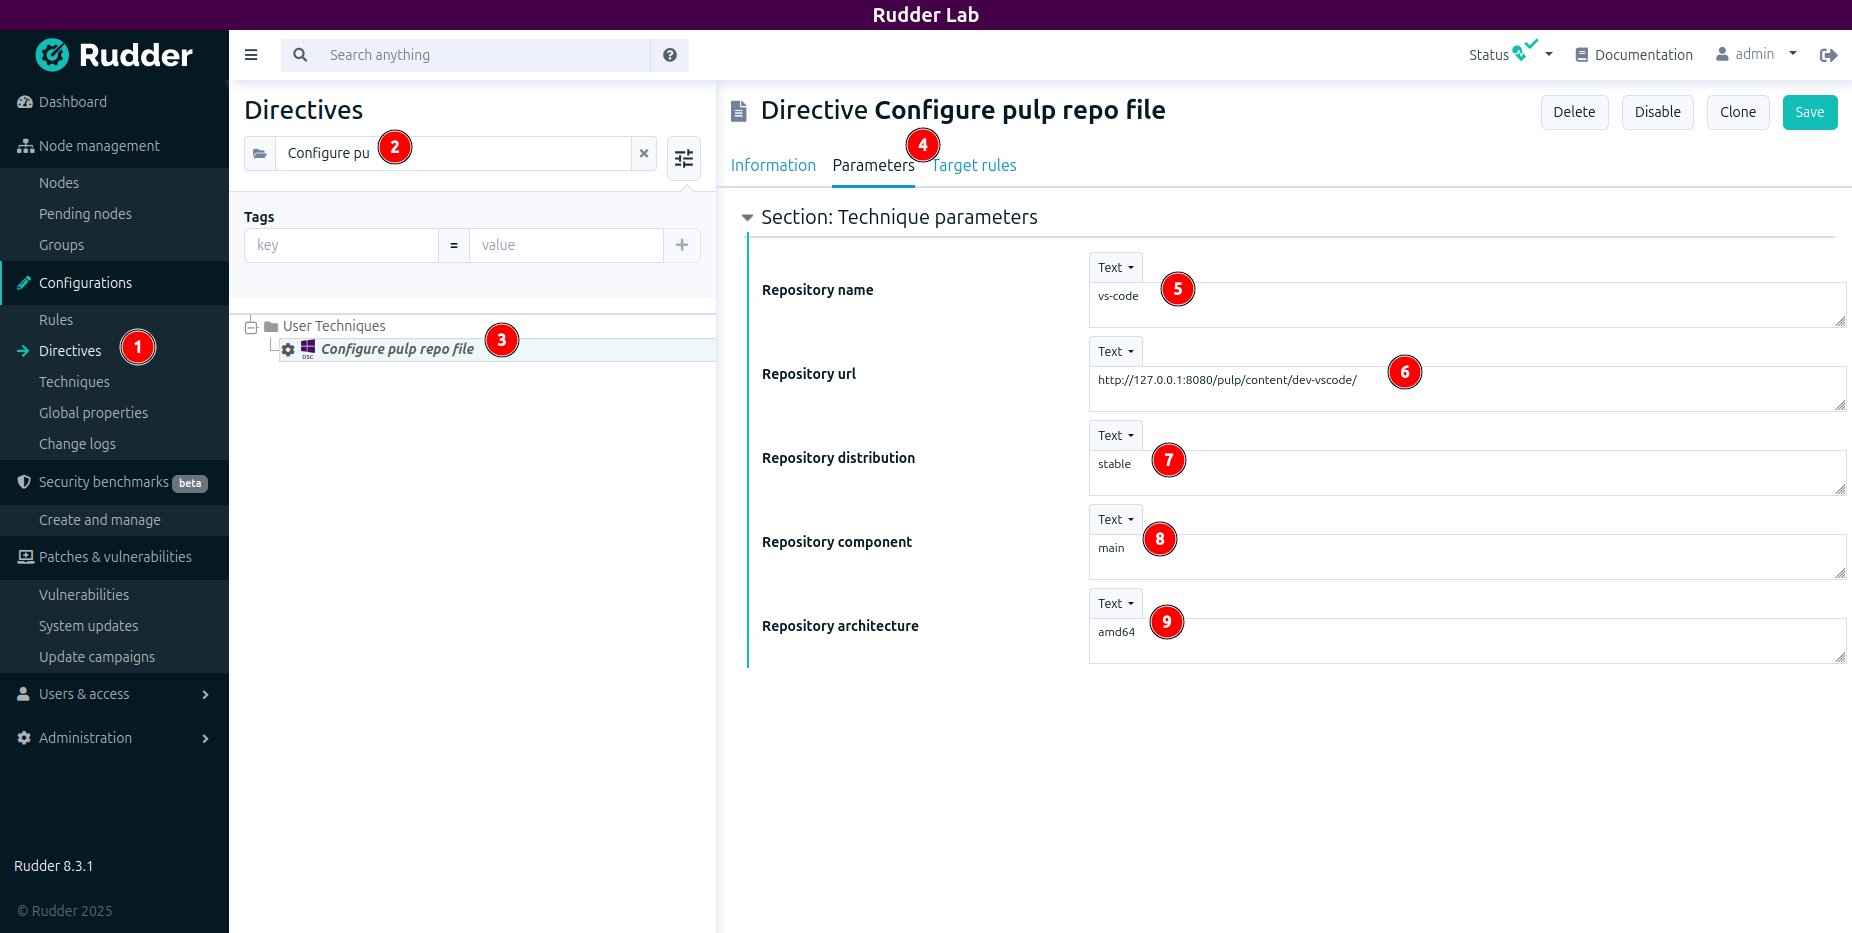
base_url in the output when you created the pulp distribution.$ pulp deb distribution list --base-path dev-vscodeTo go further